Using DHCPUtil for Lync Phone Edition DHCP Server Configuration
DHCPUtil is a utility included with Lync Server 2010 to help administrators configure the necessary DHCP options which allow Lync Phone Edition clients to sign-in using only an extension and PIN. I’ve seen a few references out there that the tool exists and that you should use it, but not much guidance on how to actually use it.
To start, there are a few new DHCP options which Lync Phone Edition clients require:
- Option 42: NTP Server
- Option 43: Certificate Service Provisioning URL
- Option 120: SIP Server
NTP is used to provide a time source to clients, the certificate service is a built in Lync service which distributes certificates to endpoints, and the SIP server is where the clients should attempt to register to. The certificate service should not be confused with an internal CA in your organization. These certificates are distributed exclusively by Lync and are not part of any PKI.
So a bright Lync administrator might hop over to their DHCP Server MMC and try to enter these options. Except for Option 42, these options do not exist by default so you need to create them on the server first. You can either do this manually which can be a real pain, or leverage DHCPUtil and DHCPConfigScript.bat.
You’ll quickly find that if you chose the manual route you’ll be sorry. These options need to be entered in a binary format and the Windows DHCP Server MMC does not allow you to paste in a binary string. So unless you want to enter a ridiculously long binary string you’ll want to get friendly with DHCPUtil.
To run this utility locally on a DHCP server you need to first do two things:
- Install the VC++ 2008 x64 redistributable on the DHCP server. You can find this on the Lync media.
- Copy DHCPUtil.exe and DHCPConfigScript.bat from a Lync server installation to the DHCP server. These files can be found in C:\Program Files\Common Files\Microsoft Lync Server 2010.
Now on your DHCP server open a command prompt and CD into the folder where these two tools are located. Before running the tool you need to know two pieces of information:
- The SIP Server address. This is the FQDN of the pool.
- The Web Server address. This is the FQDN of the web components. If you’re not using DNS load balancing this will be the same as the SIP server address. When using DNS load balancing this will be the address which resolves to the hardware load balancer for port 443 traffic.
Once you have that information run this command:
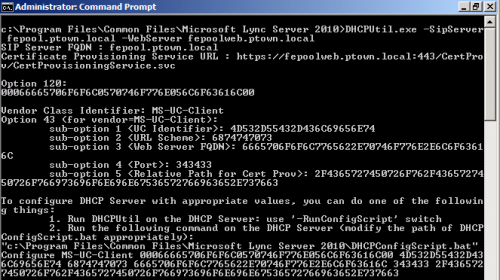
DHCPUtil -SipServer <Pool FQDN> -WebServer <Web Components FQDN>Doing so will return the values that need to entered for options 43 and 120. Not a small list.
Simply running the command this way does not configure the DHCP server. You could take these values and enter them manually, or the easiest way is to allow the DHCPConfigScript to work its magic. To do this just run the command again, but specify an additional parameter, -RunConfigScript. For example:
DHCPUtil -SipServer fepool.ptown.local -WebServer fepoolweb.ptown.local -RunConfigScript Running DHCPUtil this way will pass the values it returns to the DHCPConfigScript which will then issue the appropriate netsh commands to configure the server. It will start by cleaning up the configuration by removing any existing Option 120 entries or MSUCClient classes. It will then add the option and class back, and proceed to populate the values for each based on the SipServer and WebServer values.
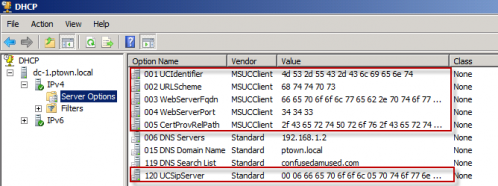
After running the script you can see the options are added:
DHCPUtil and the DHCPConfigScript do not configure Option 42. This option is not necessarily required, but not having this in place can delay the phone sign-in process. Clients do fall back to time.windows.com as an authoritative source, but only after a timeout period. In order to prevent this delay it’s recommended to enter this DHCP option. Good news: this one can be done in the MMC!
- Open up the DHCP MMC and expand
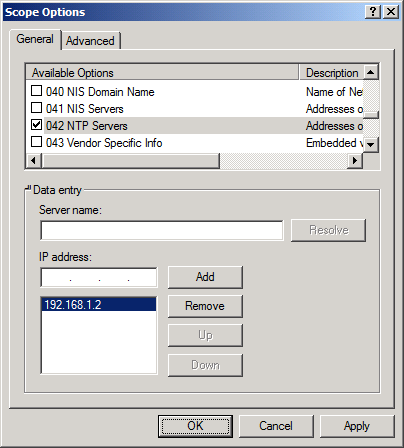
\IPv4\Server . - Right-click on Server Options and select Configure Options.
- Scroll down and select the checkbox 042 NTP Servers.
- Enter the IP address of a NTP server and then click Add. Typically this will be the IP addresses of domain controllers.
- Repeat for any additional NTP servers and then click OK.
Repeat these steps for any additional DHCP servers that provide IPs to phones for this pool.
As a last step in the process DHCPUtil can actually test the configuration for us. You’ll want to run it this time from a client machine, or another server in the environment. Even a Lync server works fine for this test.
Open a command prompt and CD into the folder where DHCPUtil is located. Run the command with the -EmulateClient parameter:
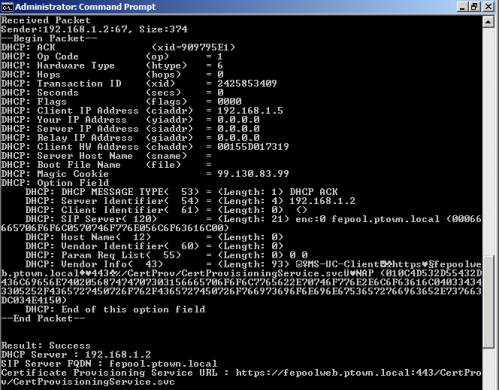
DHCPUtil -EmulateClientThis will query DHCP servers and verify if the correct values are returned. You can see in the output whether the options test was successful or not and verify the URLs returned for each service:
After all this you should be able to fire up a Lync Phone Edition device and sign-in successfully using just a phone number and PIN.


